In part 2 of this series, we will demystify how multiple containers running on the same host communicates with the host and vice versa.
Topics to be covered
- Setting up multiple containers on the host
- We will understand about Linux bridge
- Set up container networking from scratch using Linux commands
Setting up the multiple containers on the host
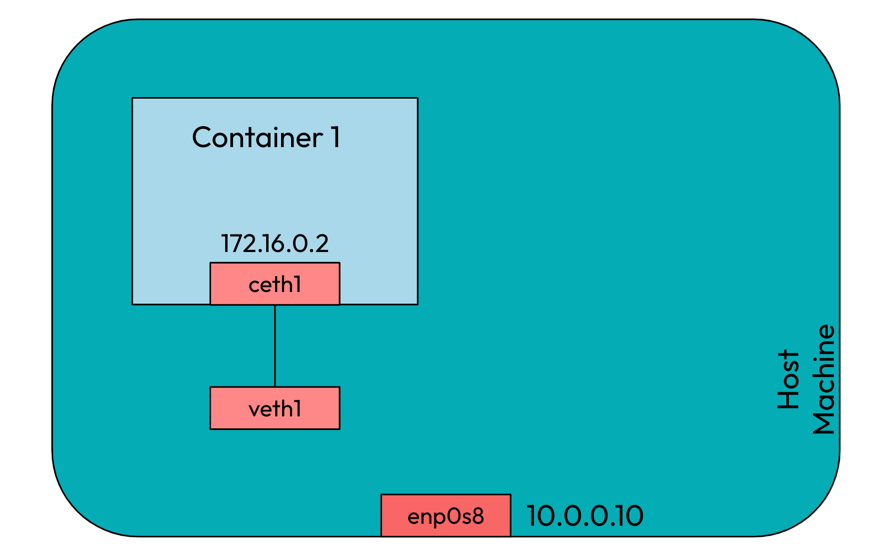
In part 1, we had single container running on the host, and it was able to communicate with the host. The implementation of it is shown below.
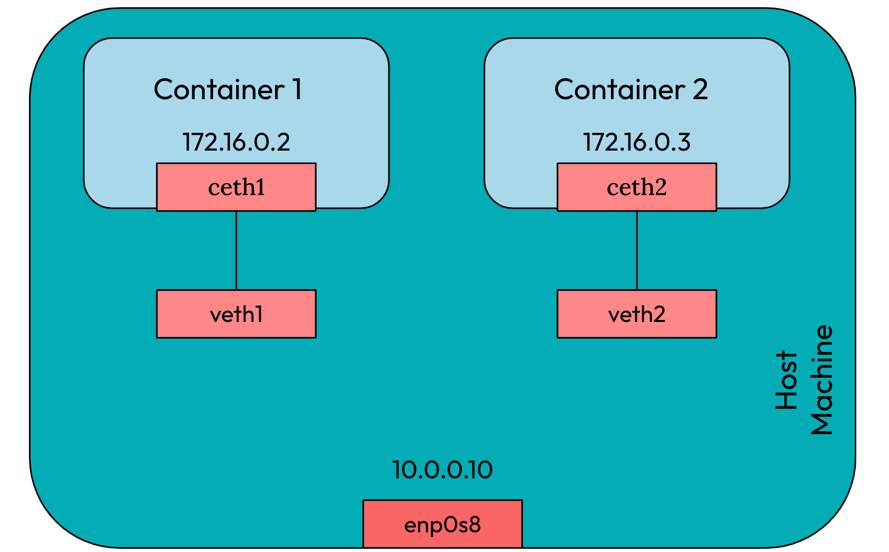
Now consider that we want to have one more container named container 2 as shown below. We created veth pair named veth2 and ceth2, attached one end (ceth2) inside the container and another end (veth2) in the host. This way the container 2 will be able to talk with the host.
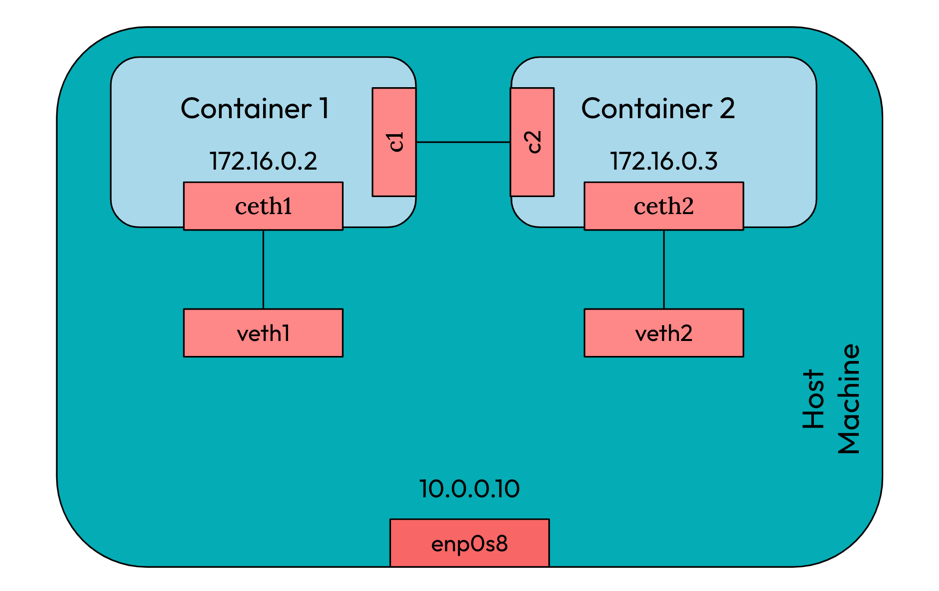
But with this, how will container1 and container2 will communicate with each other? One possible way which I could think of now is to create another veth pair and connect two containers with each other as shown below.
You might now have a question is what was so difficult with this. Think of having one more container named container3, and further more containers. Now if all the containers wants to communicate with each other, we will end up creating many veth pairs which is not the ideal way.
How can we achieve that 🤔?. Think for few minutes ….
Okay, it’s the right time to introduce one more container networking constituent element.
Linux Bridge
Linux bridge is a virtual device which allow forwarding packets to the interfaces that are connected to it.
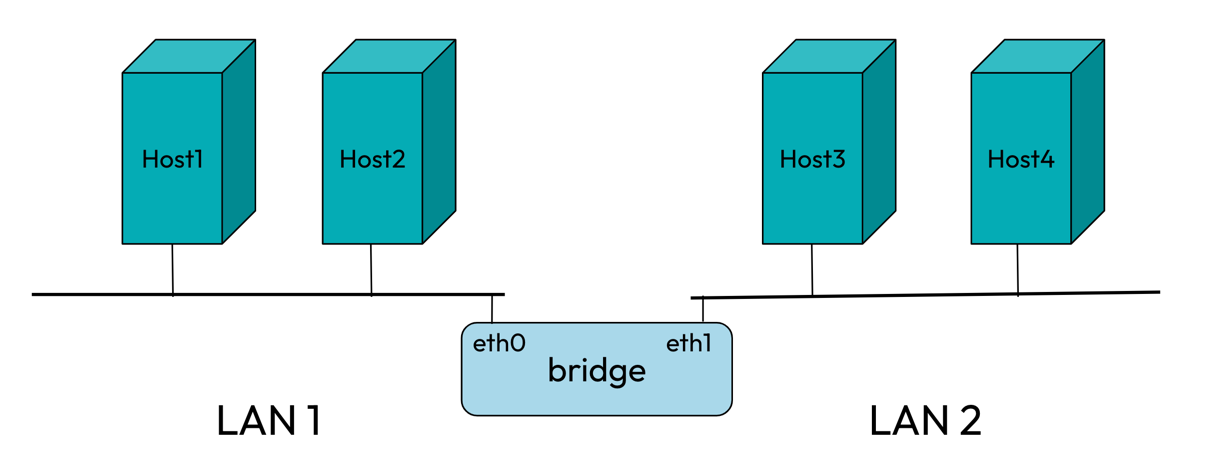
In the above diagram, we have two networks LAN1 and LAN2 connected by a bridge allowing host1 in LAN1 to send packets to host4 in LAN2. Any devices connected with bridge can communicate with each other by forwarding packets.
In our multi container scenario, we can create a bridge and attach our containers to it that will facilitate all containers to communicate with each other.
Continuing with setting up the multiple containers on the host
We will create a bridge and to attach containers to it, we can put one end of veth pair in container and attach other end with the bridge as shown.
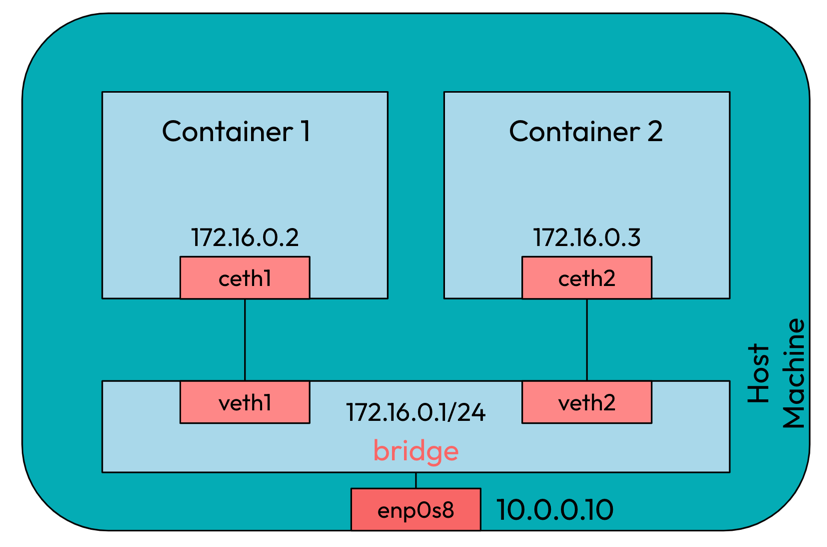
Now inside the containers we can set bridge as the default gateway to send packets to each other and the host. If any packets are sent to the bridge, the bridge can forward to the destination connected to it.
Now let’s switch back to the terminal and write some scripts 😎
Prerequisites
In this article also, we are using the vagrant ubuntu/jammy64 virtual machine. Make sure you have the vagrant installed. Here is the link to the vagrant file to set up the VM.
To start the VM, go to the directory where you downloaded the vagrant file and then execute the below commands:
#To start the VM
vagrant up

#To SSH into the VM
vagrant ssh
Note: All the commands in the following articles are run with root privileges. Either you can add
sudobefore each command or switch to different a user with root privileges by runningsudo su
Set up container networking from scratch using Linux commands
In part 1 of this series, we already saw how to create network namespaces, add routes, run command inside network namespace etc. In this I will quickly run the commands. We will focus more on the bridge part to help you understand how containers are attached to it and how packets are sent via it.
To create two network namespace container1 and container2
ip netns add container1
ip netns add containe2
To create two veth pairs
ip link add veth1 type veth peer name ceth1
ip link add veth2 type veth peer name ceth2
To attach one end of each veth pair with containers
ip link set ceth1 netns container1
ip link set ceth2 netns container2
To enables the interfaces inside the containers
ip netns exec container1 ip link set lo up
ip netns exec container2 ip link set lo up
ip netns exec container1 ip link set ceth1 up
ip netns exec container2 ip link set ceth2 up
To assign ip address to interface inside containers
ip netns exec container1 ip addr add 172.16.0.2/24 dev ceth1
ip netns exec container2 ip addr add 172.16.0.3/24 dev ceth2
To create a bridge, run
ip link add br0 type bridge
This will create a bridge named br0. Runip linkto list the bridge.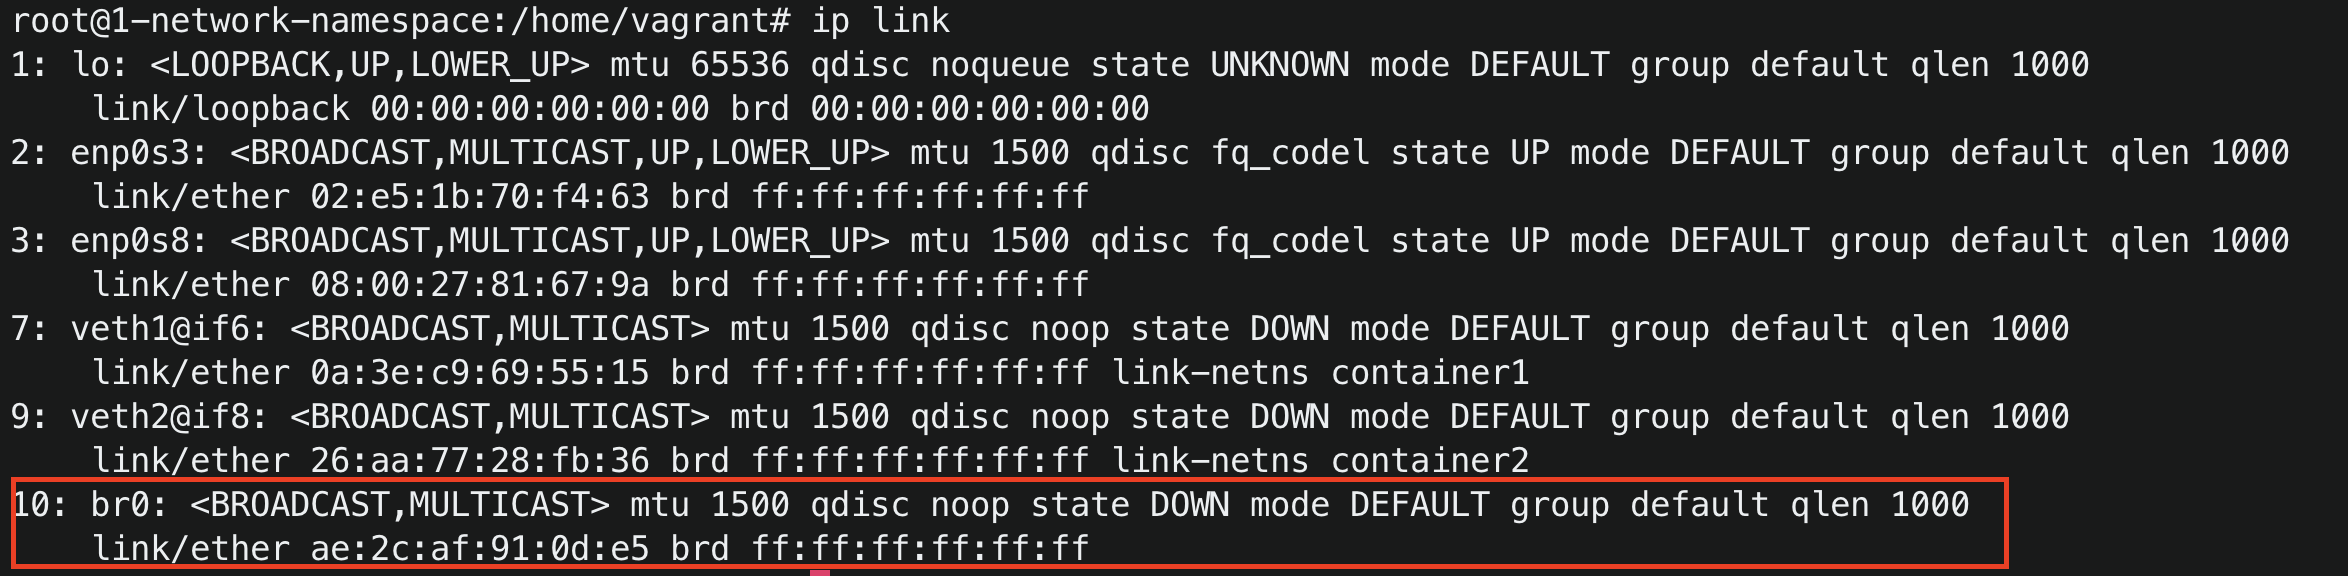
To attach the veth1 and veth2 to the bridge
ip link set veth1 master br0
ip link set veth2 master br0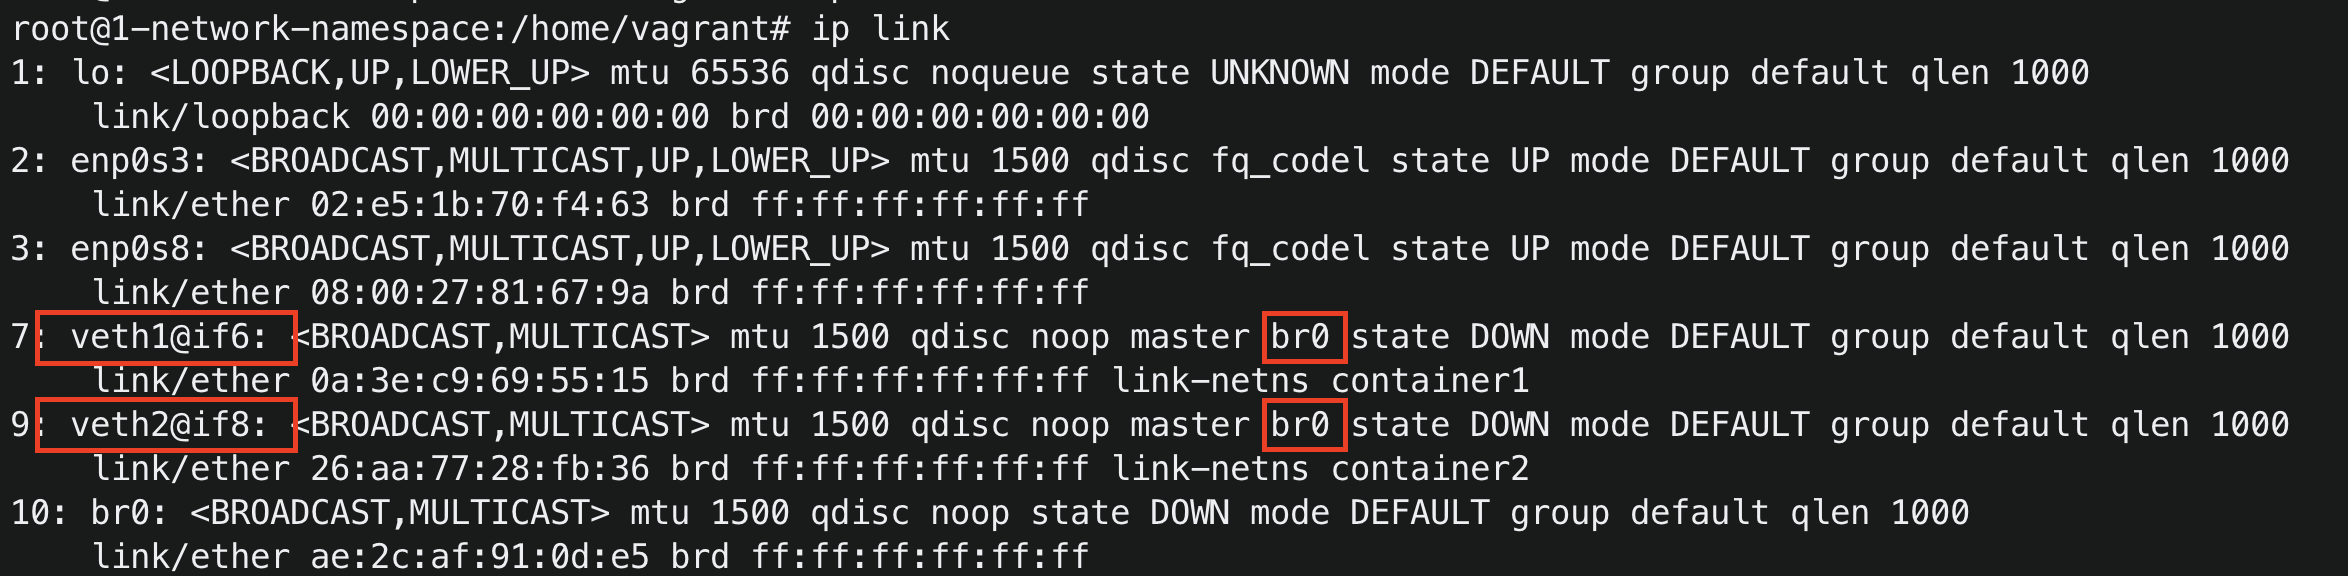
To enable veth1, veth2 and bridge br0
ip link set veth1 up
ip link set veth2 up
ip link set br0 up
To assign an ip address to the bridge, Run
ip addr add 172.16.0.1/24 dev br0
A route is added in the host, it means any traffic which is destined for 172.16.0.0/24 send it via bridge and the source ip of the packet will the bridge ip address 172.16.0.1
To ping container2 form container1, Run
ip netns exec container1 ping 172.16.0.3
You can now ping container 1 and container 2 from the host, ping containers from each other. But if you try to ping host from any containers (ip netns exec container1 ping 10.0.0.10), it will fail saying the host is unreachable because there is no route in containers saying how to forward packets destined for host.To add a default route in containers
For container1, Runip netns exec container1 ip route add default via 172.16.0.1 dev ceth1
For container2, Runip netns exec container2 ip route add default via 172.16.0.1 dev ceth2
This adds a default route in the containers saying if no route matches for the destination, use bridge(172.16.0.1) as the default gateway to forward all packets and the out interface is ceth1 and ceth2.To ping to internet from container 1, Run
ip netns exec container1 ping 1.1.1.1 The ping to internet did not succeed!!
Give yourself some time to think why cannot the containers reach to the internet….
In part 3, we will see how the containers can connect to the internet.
Conclusion
In this, you learned how multiple containers running on a single host can communicate with each other. You also learned about linux bridges and created a linux bridge to attach containers to it.
In part 3, we will try to resolve the connection between the containers and the internet. You will learn about iptables, network address translation etc.


