Understanding PXE Boot
What is PXE Boot?
The Preboot Execution Environment (PXE) specification describes a standardized client-server environment that boots a software assembly retrieved from a network on PXE-enabled clients.
Why PXE Boot?
- Simplify Pi provisioning and maintenance as much as possible.
- Automate updates/upgrades as much as possible.
Netbooting is a good path to achieve this. For example, when you netboot a Pi, it does not require an SD card to boot. The OS and file system live on a central server. Because most provisioning happens on a central server, we can eventually automate it via scripts.
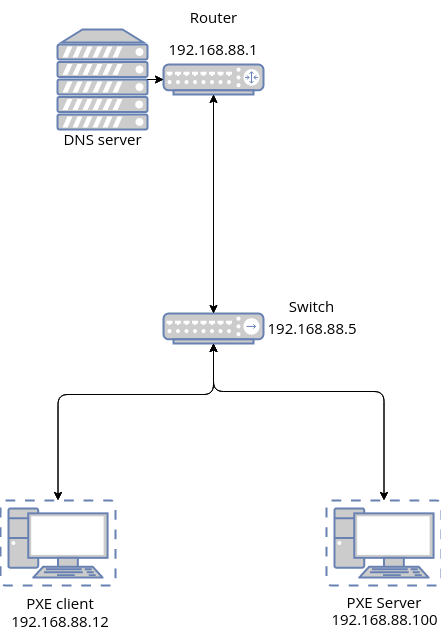
PXE Boot Sequence
Power On Raspberry Pi (PXE Client):
- The user powers on the Raspberry Pi device configured for PXE boot.
PXE Boot Initialization:
- The Raspberry Pi initiates a PXE boot process and sends a PXE boot request (DHCPDISCOVER) to the network.
DHCP Server Response:
- A DHCP server on the network receives the PXE boot request.
- The DHCP server assigns an IP address to the Raspberry Pi and responds with DHCP offer (DHCPOFFER) containing network configuration details.
PXE Client Request to Main Router:
- The Raspberry Pi, acting as a PXE client, sends a TFTP request for specific files (e.g., start4.elf) to the main router’s IP address.
- The main router receives the TFTP request from the PXE client.
Router Redirects TFTP Request to PXE Server:
- The main router, configured for PXE boot services, redirects the received TFTP request to the PXE server where the TFTP server is running.
- The router forwards the TFTP request to the PXE server’s IP address.
PXE Server Response:
- The PXE server, hosting the TFTP server, receives the redirected TFTP request from the main router.
- The TFTP server on the PXE server responds with the requested file (e.g., start4.elf) to the PXE client (Raspberry Pi).
File Transfer and Execution:
- The Raspberry Pi (PXE client) receives the requested file (start4.elf) from the PXE server’s TFTP server.
- The Raspberry Pi executes the received file, which may be part of the initial boot process or firmware loading for the device.
Boot Process Continues:
- Depending on the boot configuration and setup, the Raspberry Pi may continue to load additional files or components necessary for booting, such as bootloader configurations, kernel images, and initial RAM disks.
NFS Mount for Root File System:
- Once the boot process is completed, the Raspberry Pi performs an NFS mount to access the root file system, which is mounted on the PXE server.
- This step allows the Raspberry Pi to access and use the root file system located on the PXE server over the network.
Setting Up The Infrastructure
Required Components
To implement netbooting for Raspberry Pi devices, you’ll need the following components:
- Raspberry Pi units acting as PXE clients connected via Ethernet to the router or switch.
- Raspberry Pi as a PXE server containing boot files and user files connected via Ethernet to the router or switch.
Configuration
PXE Boot Client Configuration
Configuring Boot Order
To set the boot order on your Raspberry Pi, follow these steps:
- Access raspi-config: Run
sudo raspi-configin the terminal to open the Raspberry Pi configuration tool. - Navigate to Advanced Options: Within raspi-config, choose “Advanced Options” from the menu.
- Select Boot Order: In the Advanced Options menu, select “Boot Order.”
- Choose Network Boot: Within the Boot Order settings, select “Network Boot” as the desired boot option.
- Save Changes and Reboot: Confirm the selection and exit raspi-config. Reboot the Raspberry Pi for the changes to take effect.
Important Note: After rebooting, ensure that you reboot back into Raspberry Pi OS and not just shut down the device. This is necessary for the change in boot order to be programmed into the bootloader EEPROM.
To verify that the boot order has been set correctly, run the following command after rebooting:
$ vcgencmd bootloader_config
This command will display the current bootloader configuration, confirming that the boot order is set to prioritize the SD card first, followed by network boot.
PXE Boot Server Configuration
Install the packages needed
$ sudo apt update
$ sudo apt install -y nfs-kernel-server dnsmasq
The client Raspberry Pi will need a root file system to boot from: we can use a copy of the server’s root filesystem and place it in /nfs/<MAC_ADDRESS>.
$ sudo mkdir -p /nfs/<MAC_ADDRESS>
$ sudo cp -a ~/userfiles/* /nfs/<MAC_ADDRESS>
Configure /etc/fstab for the client
$ echo | sudo tee /nfs/<MAC_ADDRESS>/etc/fstab
$ echo "proc /proc proc defaults 0 0" | sudo tee -a /nfs/<MAC_ADDRESS>/etc/fstab
$ echo "192.168.XX.XX:/tftpboot/<MAC_ADDRESS>  /boot  nfs  defaults,vers=4.1,proto=tcp 0 0" | sudo tee -a /nfs/<MAC_ADDRESS>/etc/fstab
Configuring the /etc/fstab file for the PXE client is essential to ensure that the client mounts the necessary file systems correctly during the boot process.
Export the root file system created earlier, and the TFTP boot folder
$ echo "/nfs/<MAC_ADDRESS> *(rw,sync,no_subtree_check,no_root_squash)" | sudo tee -a /etc/exports
$ echo "/tftpboot<MAC_ADDRESS> *(rw,sync,no_subtree_check,no_root_squash)" | sudo tee -a /etc/exports
Copy the boot files to the specified directory
$ sudo mkdir -p /tftpboot/<MAC_ADDRESS>
$ sudo chmod 777 /tftpboot
$ sudo cp -r ~/bootfiles/* /tftpboot/<MAC_ADDRESS>
Important Note: Replace 192.168.XX.XX with the IP address of PXE server and <MAC_ADDRESS> with the MAC address of PXE client.
Configure dnsmasq.conf
Dnsmasq simplifies PXE booting because it’s a versatile tool that combines DHCP, DNS, and TFTP services into one package.
- Integrated Services: Dnsmasq handles IP address assignment (DHCP), hostname resolution (DNS), and boot file delivery (TFTP), making it a one-stop solution for PXE booting.
- Lightweight: It’s lightweight and efficient, meaning it doesn’t require a lot of system resources to run, making it suitable for a wide range of devices and environments.
- Easy Configuration: Dnsmasq is easy to set up and configure, with straightforward options for defining DHCP lease ranges, DNS settings, and TFTP root directories.
$ cat << EOF | sudo tee /etc/dnsmasq.conf
interface=eth0
log-dhcp
enable-tftp
log-facility=/var/log/dnsmasq
tftp-root=/tftpboot
tftp-unique-root=mac
pxe-service=0,"Raspberry Pi Boot"
EOF
Conclusion
In conclusion, implementing PXE boot for Raspberry Pi devices streamlines deployment and maintenance by centralizing the boot process and file systems. Automation of these processes further enhances efficiency and reduces manual intervention. To learn more about automating Raspberry Pi deployment using PXE boot, click here.


