This blog will cover the foundational concepts of Docker layers, caching mechanisms, and Dockerfile optimization. Additionally, provide insights on minimizing image sizes, adhering to security protocols, and understanding Docker’s licensing requirements.
Understanding Docker Image Layers
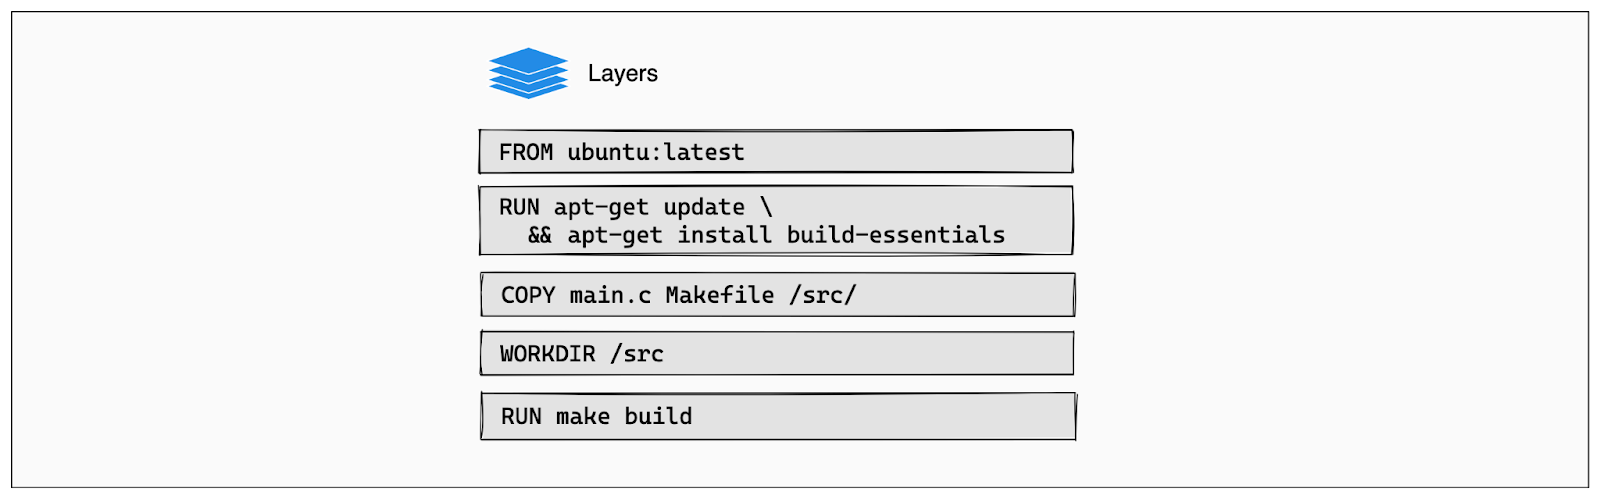
Docker images are constructed from a series of layers; each layer corresponds to instructions in the Dockerfile that modify the filesystem of the image. These layers are stacked on top of each other, forming the final image. Understanding how these layers work is key to optimizing your Docker builds.
Leveraging Docker’s Caching Mechanism for Efficient Builds
During the build process, Docker looks at each instruction in the Dockerfile and checks if an intermediate layer for that instruction already exists in its cache. If it does, and if nothing has changed that would affect that layer, Docker will reuse the cached layer instead of recreating it. This reuse of layers speeds up the build process significantly and makes it more efficient in terms of resource use.
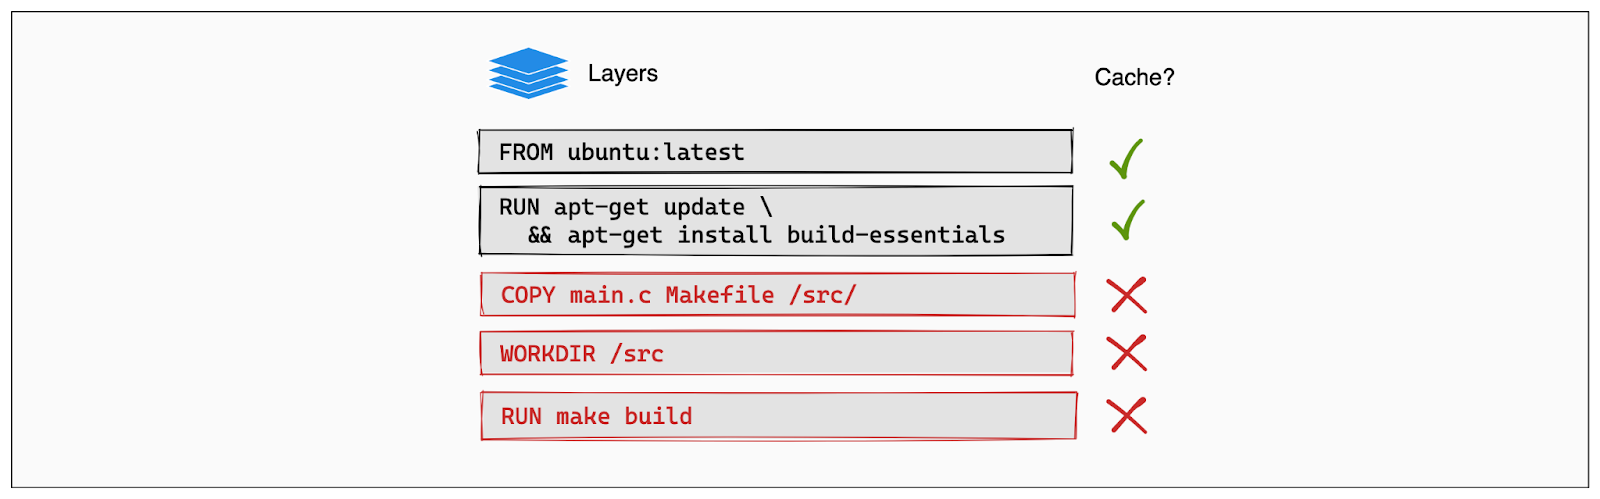
For example, if your Dockerfile starts with a RUN instruction to install dependencies, and these dependencies haven’t changed, Docker will use the cached layer from a previous build for this instruction. This avoids the need to re-download and install dependencies every time you build the image, as long as the corresponding instruction in the Dockerfile remains unchanged.
Best Practices for Dockerfile Structure
To make the most of Docker’s caching mechanism, it’s important to organize your Dockerfile instructions thoughtfully. Instructions that are less likely to change should be placed near the top of the Dockerfile. This allows Docker to cache these layers early in the build process, and they can be reused in subsequent builds as long as they remain unchanged.
For instance, system packages and application dependencies don’t change often once they’re set. By placing these instructions (like RUN apt-get install -y some-package or RUN npm install) near the top of your Dockerfile, you ensure that Docker can cache them effectively. Subsequent instructions, which might change more frequently (like COPY . /app), are placed lower in the Dockerfile. This strategy minimizes the number of layers that need to be rebuilt in each build, saving time and computational resources.
Let us look at an example of Non Optimised Docker Build Vs an Optimised Docker Build
Non Optimised Docker Build
In this Dockerfile, we demonstrate a non-optimised Docker build where we directly copy all files at once using COPY . ., causing unnecessary rebuilds of layers even when minor changes occur.
FROM node
WORKDIR /app
COPY . .
RUN npm install
RUN npm build
Optimised Docker Build
In this Dockerfile, we show the optimized approach where we first copy just the package.json yarn.lock file which might not change more frequently (like COPY . /app), and then execute RUN npm install, followed by copying the remaining application files with COPY . ., significantly improving build efficiency by leveraging Docker’s caching mechanism.
FROM node
WORKDIR /app
COPY package.json yarn.lock .
RUN npm install
COPY . .
RUN npm build
Incorporating these principles into your Dockerfile can drastically improve your build times and resource usage, making your development process more efficient. This strategic placement of instructions, combined with Docker’s robust caching mechanism, is essential for optimising Docker environments in production.
How to keep your docker images small?
Start with an appropriate base image. For instance, if you need a JDK, consider basing your image on a Docker Official Image which includes OpenJDK rather than building your own image from scratch.
If you have multiple images with a lot in common, consider creating your own base image with the shared components, and basing your unique images on that. Docker only needs to load the common layers once, and they are cached. This means that your derivative images use memory on the Docker host more efficiently and load more quickly. Let us look at an example below
Creating a Base File
# Base Dockerfile

FROM node:14

WORKDIR /app

RUN npm install express \
      && npm install axios \
      && npm install body-parser

CMD ["node", "index.js"]
Creating Derivative images from the base image:
# Derivative Dockerfile for Services

FROM base_image

COPY /ServiceA /app/ServiceA

CMD ["node", "ServiceA/index.js"]
- Keeping your layers small is a good first step, and the logical next step is to reduce the number of layers that you have. Fewer layers mean that you have less to rebuild, when something in your Dockerfile changes, so your build will complete faster.
# Update the package index ( Creates a new layer )
RUN apt-get -y update

# Install Python with its dependencies ( creates a new layer )
RUN apt-get install -y python

# Update package index & install python with it's dependencies in a single commange ( Creates a single new layer )
RUN apt-get -y update && RUN apt-get install -y python
- To keep your production image lean but allow for debugging, consider using the production image as the base image for the debug image.
Dockerfile Best Practices
Decouple Applications to make sure each container should have only one concern , each handling a single concern, primarily aids in horizontal scalability.
For example, if your Docker image contains both the application and the database, scaling the database due to increased load would also necessitate scaling the application instances, even if the application itself isn’t under similar load. This inefficient scaling can lead to unnecessary resource utilization and increased costs.
Whenever possible, sort multi-line arguments in the dockerfile alphanumerically to make maintenance easier.
Use .dockerignore files in Docker builds to exclude unnecessary files and directories from being included in the image.
Use the SHA256 Digest to reference docker images , this method ensures that you are always pulling the exact version of the image you intend to use, which is useful for maintaining consistency and security in your deployments.
To get the SHA256 Digest of the Docker Image you are using , execute this command.
docker inspect --format='{{index .RepoDigests 0}}' $IMAGE
FROM alpine:3.19

Better Version - Using SHA 256
FROM alpine:3.19@sha256:13b7e62e8bdf80e64dbb745
Security Practices for Docker
Use Official Docker Images
Multi-stage builds minimise complexity and reduce vulnerability risks by allowing selective artifact inclusion, avoiding the inheritance of vulnerabilities from base images.
Docker recommends that you rebuild your Docker image regularly to prevent known vulnerabilities that have been addressed. When rebuilding, use the option —no-cache to avoid cache hits and to ensure a fresh download.
Secret Management: Avoid hardcoding sensitive information in Dockerfiles or configuration files. Instead, use Docker secrets or environment variables to securely pass secrets to containers.
Understanding Docker Licensing
When incorporating Docker into your business operations, it’s crucial to understand and adhere to Docker’s licensing requirements. Docker offers various types of licenses depending on the scale of use and the features required. These range from free versions suitable for developers and small projects to enterprise editions designed for large-scale commercial deployments.
So, talking about the docker license change, the personal subscription has a free plan. The personal subscription is valid for organizations having less than 250 employees. In contrast, the ones with 250+ organizations need to use their paid version.
By understanding Docker licensing and ensuring that your usage complies with these legal requirements, you protect your organization against legal risks and optimize your Docker environments with the appropriate tools and support.
For more information please refer:https://www.docker.com/legal/docker-subscription-service-agreement/
Conclusion
To wrap up, getting the hang of Docker is about more than just wrapping your app in a container. It’s about really getting into the nitty-gritty—like setting up Dockerfiles properly, making smart use of Docker’s caching perks, and keeping those images lean and mean. On top of that, keeping things above board with Docker’s licensing rules is key for keeping your operations smooth and compliant. Stick with these strategies, and you’re on your way to making your Docker setups as efficient, secure, and compliant as they can be.


